Table of contents
- Getting Started with PARADISEC
- How to become a PARADISEC user
- How to become a PARADISEC depositor
Getting Started with PARADISEC
Last updated: 09 May 2026
How to become a PARADISEC user
In order to view items in the PARADISEC archive, you need to first sign up and become a PARADISEC user.
The process of signing up on our website is simple; however, you need to have an email address. If you do not have an email account, contact us at PARADISEC and we can help you.
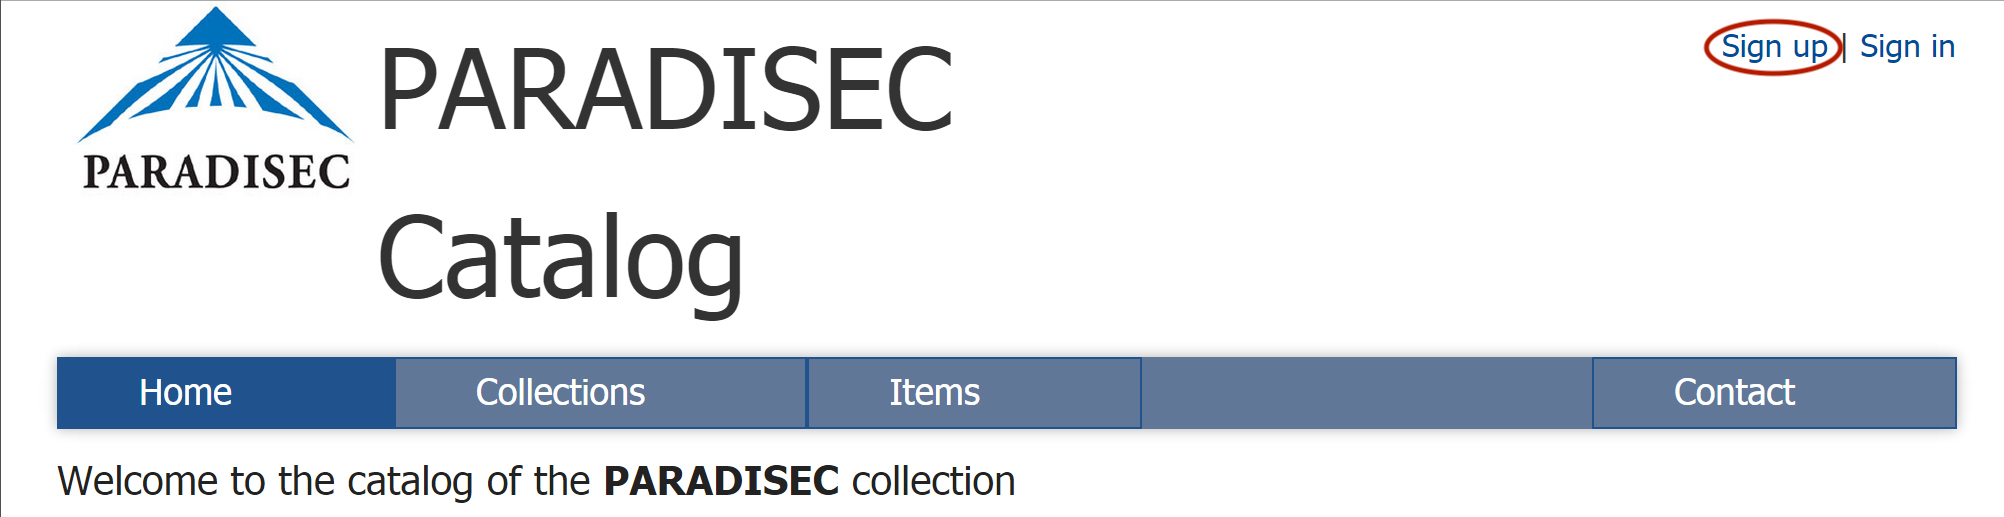
Go to the PARASDISEC catalog website: http://catalog.paradisec.org.au/, and click on Sign up in the upper right‐hand corner. Once you sign up, you get an automated message informing you to check your email to confirm your account:
Click on the link in your email to confirm.
Congratulations, you are now a PARADISEC user!
 As a registered user you can access data in collections having OPEN ACCESS once you sign in. Each new open-access collection you visit, you will need to agree to PARADISEC’s conditions of access.
 If the collection has CLOSED ACCESS, you may send a request to access data that has restrictions on viewing by following instructions provided by the collector on their catalog page.
Read more about PARADISEC’s Conditions of Access here.
How to become a PARADISEC depositor
STEP 1: Sign up to become a PARADISEC user and explore the archive
Follow the above instructions and become a PARADISEC user. Once you have done so, it is recommended that you browse the collections held in PARADISEC so that you can explore the different ways they can be organised. Here are some examples of different collections:
- PhD thesis: OE1 is a collection of narratives and wordlists that the depositor used in writing their PhD thesis. This includes segmented audio files that are linked to the exemplar utterances within the thesis.
- Field methods course: The MEU1 collection holds all recordings generated during a Linguistics field methods course. Note how the different type of events (classroom recordings vs breakout sessions) are kept together by the nature of the item names.
- Separate collections for each language/dialect/variety: Explore two of this depositor’s 27 collections, SDM42 and SDM45. Each of these collections feature one language variety. There is no limit as to how many collections you can create.
- Many languages in one collection: In the DD1 collection, the depositor has included recordings of over 25 languages within the one collection. This collection is still growing!
STEP 2: Contact PARADISEC
Once you have completed the tasks outlined below contact the PARADISEC admin team at admin@paradisec.org.au to get a collection started.
Take a quick look at what you are intending to archive
- How you want your material organised?
- Do you need one collection? Or more than one?
- Make note of the different file formats you have.
Information to provide to PARADISEC
Below is a list of information you’ll need to provide PARADISEC when you are ready to start a collection:
- A brief title of your collection
- A more detailed description of your collection
- What file formats or physical media do you want to put in the collection(s)
STEP 3: Organise materials to be sent to collection
PARADISEC’s metadata spreadsheet
This section only outlines the spreadsheet option for metadata capture. To learn more about LaMeta metadata tool, please visit the Metadata & Data Management page.
When you are ready to begin, PARADISEC offers a simple spreadsheet that allows the arcive administators to automatically create the catalog entries for items in your collection. You can acces the spreadsheet here. (If the .xlsx file does not download automatically, then right-click on the link to save the file) or visit our Deposit page here.
Please do not alter the structure of the spreadsheet, as this will prevent the auto-upload process for us.
The PARADISEC team can help you with any questions you may have when filling in the metadata spreadsheet.
Once your collection has been created and has been populated with the metadata for your items, you can edit you collection by adding further information directly via the catalog pages. You can add details such as:
- your institutional affiliation
- a more precise map (you can manually drag a rectangular selection to get a more precise location
- you can change access conditions to individual items
- you can assign editor privileges to a colleague or research assistant who may be helping you enrich the collection’s metadata
PARADISEC’s file naming conventions
Getting your archival file names in order should come after you have created your collection and after you have settled on the organisation of your items within your collection, because the collection and item IDs make up part of your file names.
ANATOMY OF A PARADISEC FILE NAME
Our system requires all files to adhere to specific file-naming conventions. This section will step you through the required parts of the filenames.
TEMPLATE: [CollectionID] - [ItemID] - [ContentFile] . file extension
| Coll ID | Item ID | Content | Extension |
|---|---|---|---|
| JCM01 | 20150908_wordlist | 01 | .wav |
-
CollectionID is your PARADISEC collection ID and it typically has the shape of your initials in capital letters and a number. This ID can be determined by you, but must be confirmed as available for use by a PARADISEC administrator. This ID is created when you set up a collection in PARADISEC.
-
ItemID An item could be recordings from a cassette tape, or now in the born-digital age, it is typically a recording event containing all related files from that session, including audio, video, images, transcriptions, etc. You must use a terse Item ID here; Item IDs must be under 30 characters. You may use an underscore ( _ ) if you need a separator; hyphens ( ‐ ) are prohibited within your Item ID as they are PARADISEC operators. You could have speaker initials in your Item ID (ABC), name of the task (wordlist), field site (NT); however, all of that can be put into metadata fields, rather than in your file names. You could simply name your items 001, 002, 003, etc.
-
ContentFile is the final necessary part to a file name. This part of the name allows you to enumerate files of the same format, i.e. photos with 001, 002, etc, or multiple tracks of a single audio or video session, 01, 02, 03, etc. You could distinguish the type of microphone used for an audio track in this part of the file name, e.g. LM (lapel mic) or HM (for head mounted mic).
STEP 4: Fill out a PARADISEC deposit form for each collection you are creating
You will need to fill out a deposit form that provides PARADISEC with your contact information, access conditions for your collection, including any restrictions. (If the .xlsx file does not download automatically, then right-click on the link to save the file). Fill in the form, sign it, scan or photograph it, and email it back to us. We keep this digital record with your collection.
STEP 5: Send your files to PARADISEC
If you are planing to archive digital files with PARADISEC, you can send us OneDrive, Dropbox,or Google Drive links. These options are the best means to transfer files to PARADISEC. If you do not use any of those cloud storage options, but would like to transfer your files this way, contact PARADISEC and we can create a SharePoint/OneDrive folder for you to use for transferring files to us.
If uploading files to a cloud service is not possible due to a lack of computer access or poor internet connections, you can post a hard drive of your materials to PARADISEC at:
Contact Us
PARADISEC
Room 3019, Sydney Conservatorium of Music C41
The University of Sydney
NSW 2006 AUSTRALIA
Phone: +61 2 9351 1279
⬆️ Back to top

This work was created by Julia Colleen Miller and is licensed under a Creative Commons Attribution-NonCommercial-ShareAlike 4.0 International License.